Showing posts with label crafts. Show all posts

Friday, April 17, 2015

Photo Frame Collage Project

I've seen these photo wall collages for years and have always thought they are a clever way of clustering neat visual elements.


Many moons ago, when I was still rocking a 35mm camera, I tended to have a ton of physical photos kicking around. After a lot of years of collecting frames for all my photos, I had ended up with a pretty decent stockpile of neat frames.  So I had an idea of creating a cool wall collage with the nicest of the ones I had collected.

The only problem: they were all different colors that didn't really go well together. Solution: painting time!!


Conveniently, I had some paint left over from the table refurbish project, so I simply used that to repaint the frames I had.

Once I had the frames finished, I arranged them in about a dozen ways to try to figure out what worked with what I had and came up with this layout.


Once I had the frame configuration figured out, it took me a while to decide what I wanted to do with what would go inside them. Finally, I decided to fill each frame with pieces of cloth from my quilt project.


Then began the task of getting this bad boy up on the wall. I didn't take photos of how I did this part (mostly because there was a giant mess during the process and I like pretending like all my projects are well organized and always super clean haha).

Here's how I suggest doing this:
  1. Make a layout plan on the floor or a large table (mind spacing and sizes and designs as much as possible)
  2. Turn over each frame and place a strip of parchment paper or news papers over the backs of the frames. 
  3. Feeling through the paper, mark where each frame will be hung. 
  4. Using a laser level, make sure the markers are level and tape your paper to the wall where the frames will go.
  5. Drill small holes through the paper into your wall to prepare for slightly larger nails (if you have heavy frames, you may want to use screws instead of nails)
  6. Hammer in your nails and pull off the paper from the wall
  7. Hang your frames


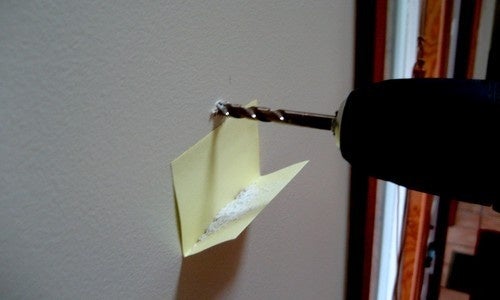
Protip: when drilling holes in walls (especially if you have plaster walls like I do), to avoid the mess, stick folded post-it notes to the wall under the place where you're going to drill your hole so that it catches all the wall mess. I learned this trick a few years ago and have been using it ever since!


Here's how mine turned out!


Wednesday, January 1, 2014

Quilting the quilt

How I spent my holidays

It's been a little over a year since I started on the Great Quilting Experiment.  I started off in November of 2012 with an idea to create a quilt and managed to feel pretty good about my very first completed block.

my first block

Not long after my first block, my trusty little beginner's Singer died a grindy, noisy death and I started looking around for a replacement.  I dropped into a sewing/craft store around the corner, KW Sewing Machines, and had a great chat with one of the saleswomen there.  I told her my level of experience, and where I wanted to go with my sewing and she introduced me to one of the coolest pieces of technology I've ever been fortunate enough to meet - the Janome 2030 QC.

It has a computer inside!

For those of you who don't know, I get a little geeky about technology so needless to say I was very impressed with the capabilities of this little beast. The hands-on creative addict in me loved everything about this machine (to name a few features: it threads its own needles, ties its own knots, and has a sweet no-pedal option for perfect speed sewing), and with a lot of work I managed to secure this beautiful piece of work by January of 2013 so that I could continue my sewing adventures.

By March of that year I'd completed about half of the 30 blocks needed for my king-size quilt (what was I thinking for my first quilt?!).  I put together a quick little photo tutorial for the custom Sarah's Choice quilt blocks I was making so that I could share the cool stuff I'd been working on.

taking a break to share my process
I worked on my quilt off and on for the next several months, and by October 2013 I'd finished all the blocks I'd needed.  I made 36 but decided to only use 30 of the 12" blocks because I'd neglected to account for the sashing and cornerstones when doing the math for a standard king size blanket.

all the blocks finished with sashing and cornerstones

Once I had the front finished, I took a break for a few months to bide my time till Boxing Day after Christmas so that I could get the batting and backing I needed to finish the quilt.  Sure enough, there were sales all over the place and I managed to pick up 3 meters of Warm and Natural cotton batting and 3 meters of wide fabric for my backing.  As soon as I had all my supplies, I immediately got to work.

safety pins are cool and all, but this stuff is a lifesaver!

I read a tip online that the easiest, quickest way to secure the layers of a quilt was a good temporary adhesive crafting spray.  They don't gum up needles and the spray itself washes out in a normal wash cycle once your project is finished.

for working with large projects, these are a MUST HAVE

Once the quilt layers were secured and I started actually quilting this huge thing (again: what was I thinking!?), I started to get very sore shoulders and realized I needed a better way to handle all the material. 

I ran out of thread pretty quickly at this stage (I only had two spools of 250 yards), so when I ran to the fabric store to get 3 more spools (which still might not be enough - I must be out of my mind), I spotted these spiffy Fons & Porter Machine Quilting Gloves designed to grip fabric easier and to reduce tension in the neck and hands when sewing.  They look cheesy, but they're fantastic - I highly recommend getting some of these if you do a lot of machine quilting.

showing some love for the walking foot

All in all, I'm very pleased with how the quilt is coming along and I can hardly believe it's been such a long work in progress.  It's been a very lovely holiday this Winter working on this final stage of the project.

coffee, quilting and Netflix - Merry Christmas and Happy New Year to me!
What I have left will probably take some time to wrap up, and then I get to try my hand at binding this bad boy.  Stay tuned for updates as I move into the next phase (and I continue to question my sanity).

Sunday, October 13, 2013

Quilting Progress


After 8 long months, I'm happy to announce that I've finished the front of my quilt!  It is a king size quilt (approx 93" x 112"), and consists of 30 13.25"* blocks with cornerstones (2" square*) and sashing (2" x 13.25"*).


Once I had the blocks all finished, I laid them out on the living room floor to make sure the two styles of blocks I'd done (squares and pinwheels) alternated properly.


Once I had the order of the blocks ready, I then sewed the blocks into rows with the sashing between the blocks, and sewed the sashing and cornerstones into rows.  Below is what the square rows looked like (I don't have a photo of the sashing and cornerstone rows.


This is the method illustrated below:


And, viola! As shown above, here's the finished front part of the quilt!


*finished dimensions - I use quarter inch seam allowances

Sunday, March 17, 2013

Sarah's Choice quilt block

Quilt Block Pattern: Sarah's Choice
Approximate Finished Quilt Size: King Size (100" x 100")
Blocks: 14" x 14" (x36)
Fabric Yardage: 

  • Dark Brown: 2 yards (1.8288 meters rounded up to 2 meters)
  • Blue: 2 yards (1.8288 meters rounded up to 2 meters)
  • Cream: 4.5 yards (4.1148 meters rounded up to 5 meters)

two each per block (x36)

four each per block (x36)

four per block (x36)

four per block (x36)


Gather the two 4 1/4" dark brown squares and the two blue squares of the same size. Use the sandwich method to sew a dark brown square to a blue square. Cut them apart to create two half-square triangle units. Press flat, with seam allowance in the favor of the blue half. Repeat to create four units.


Gather four 4 x 7" cream rectangles, two 4 x 4" dark brown squares and two 4 x 4" blue squares. Use the quick flying geese method to create four flying geese for the outer rows of your quilt block. Take care to orient the squares as shown to end up with a unit with a dark triangle on one end and a blue triangle on the other.


Arrange the pieced units and four background squares into three rows - as shown in the example illustration below. You can get creative here with how your pieces are arranged. Sew components of each row together. Press seam allowances in top and bottom rows towards the corner squares. Press seam allowances in the middle row towards the center unit.  Create thirty six blocks.


Tuesday, November 20, 2012

My White Whale

As you probably already know, I have a casual love of sewing.  To date I've done several dozen receiving blankets for new moms, two sets of two decorative throw pillows, two sets of curtains, and a baby rag quilt.  Recently I started my most ambitious sewing project; a queen size traditional quilt.

Sadly, while sewing together the pieces of my 5th block, my adorable little beginner's Shark machine started making a decidedly unhappy clunking sound.  I did all the usual things - rethreaded the machine, took the bobbin out and reloaded that, even opened the cover and oiled the right spots for the arm mechanism... turned the Little Sewing Machine That Could back on and still that icky clunk clunk clunk whenever the mechanism would turn around.

So (sew?) taking into consideration that it will cost me more to have it looked at, have it tuned up, have the timing tuned and to have it repaired than what the machine is worth, I've decided to let the Little Sewing Machine That Could rest in peace.  It taught me well, and I absolutely got every cent it was worth out of it and then some!

Now on to happier news!  I stopped in at this fantastic place near my apartment called K-W Sewing Machines (http://www.kwsewingmachines.com/) and talked to a very informative woman named Wendy about my options for a new machine considering my level of experience and my intended uses.

This is the machine Wendy had me pull out a stool and sit in front of.  And oooh my how impressed I was!  I had no idea new sewing machines could have sweet little LCD displays and so many cool features!!

This is the Janome 2030 QDC.

Here are its very cool features:

  • Top loading full rotary hook bobbin
  • 30 built-in stitches
  • 3 one-step buttonholes
  • Manual thread tension control
  • One-hand needle threader
  • Snap on presser feet
  • 7 piece feed dog
  • Free arm
  • Drop feed
  • Start/stop button
  • Speed control slider
  • Locking stitch button
  • Memorized needle up/down
  • Easy reverse button
  • Auto declutch bobbin winder
  • Extra high presser foot lift
  • Back lit LCD screen with easy navigation keys
  • Maximum stitch width: 7mm
  • Maximum stitch length: 5mm
  • Soft cover included 
I also really love the optional foot pedal.  I didn't even realize that was an option!  As an entry-level machine, it's pretty impressive the amount of handy things it comes with - including a full set of quilting feet including a walking foot for doing binding (which I've already heard horror stories about haha!). 

I have to scrounge together enough allowance (yes, I give myself an allowance shh!) to be able to get the rest of the fabric I need for my quilt and in the meantime this is my next crafty goal.  What's nice about sewing in general is it's not like many other crafts; you can pick it up and put it down for months and it's none the worse for it (assuming you store your fabrics well).

What machine do you have?  What's your White Whale?

Saturday, November 17, 2012

Quilt Project - installment 1

I decided this week to start a new project - a full-size quilt!  I'm doing a Sarah's Choice pattern, and I'll be using a series of installments to track my progress through this quilting journey.

I have to do 16 12" blocks for the size quilt that I'm making.  Then I'll be doing the sashing and border once the blocks are finished.

My goal is to get at least one block done every week.  If I get time, and I have the daylight on my side I'm hoping I can do more (I have terrible lighting in my apartment and the only time I can really get good light is when I'm home during the day on the weekends - since it's been getting dark around 4-5pm lately).

So enough of the boring details, here's the first sewn pieces: sandwich style squares


And some flying geese style rectangles


And tadaa!! My first block!


It's a lot trickier than I realized to get all the corners to line up perfectly, but hey it's only my first block so far :)

Stay tuned for further installments!

Monday, August 6, 2012

Table Refurbish pt 2 - Decoupage!

Yesterday I posted the painting and distressing I did to refurbish an old wooden coffee table.  Well today I blasted through part 2 of the refurbish - a decoupage effect on the table top with anatomy sketches!

I won't bore you with tons of details, so without further ado - here's the progress!

I used just regular glossy Mod Podge from Michael's, glossy Minwax Polycrylic from Michael's, an art knife, soft-bristled paintbrushes (medium and wide), a scraper for flattening the pictures, a hand towel for wiping up excess liquids, an art book with large-scale hand-drawn sketches, and dark coffee for staining.


I have to start off by giving due props to Mr. Kate and her awesome idea for this :)

I started with the above human anatomy sketch book and got to work ripping out every cool sketch I could find. 


 Once I had all my sketches ripped out, I laid them out the way I wanted them (approximately) on the top of the table.


Once that was done I got to do the real work!  I started on the left and moved right in layers.
Each piece was dipped in a lasagna pan (you can use any wide, flat container) with about an inch of dark black coffee in it.  Don't dip the pieces for too long or they'll tear. 

Paint a layer of the Mod Podge in the spot you're going to lay your piece down once it's been dipped.  Lay the stained piece over the glue, and use the wallpaper scraper (or whatever flat surface you're using) to get out any air bubbles.  Gently mop up any excess coffee/glue then paint over the whole area again with the Mod Podge (you just don't want puddles of coffee everywhere).

Repeat till the whole table is covered. Once the pieces are all down, take your art knife and trim the excesses off the edges of the table.  Paint the whole area again with a thick layer of Mod Podge and let the whole thing dry (about 3 hours).  


Once that is dry, you can paint on a couple layers of the Polycrylic to seal everything in.


And here's it finished and sealed!

Sunday, August 5, 2012

Distressed Coffee Table Refurbish

A few weeks ago I decided I needed to lighten up my living room.  I started coordinating so that creamy colors and soft sand colors were the predominant colors.  One of the signature pieces I had my eye on to tie this all together was the coffee table.  Mind you, a few weeks ago this table was being used to hold the monstrosity of a TV that used to live on the other side of the room (which you won't be able to see in the coming photos).

My vision for the solid wood table was to sand down the worn finish, paint the whole thing a creamy white, distress it, seal it, and plunk it back down in the living room all Martha Stewart perfect and all would be well with the world.

The idea was great and simple in my head - the work, however, would prove to be back-breaking and very tiring (I did this all yesterday, and I'm completely beat today complete with sore back, shoulders, and even my hamstrings are sore from all the bending over and sanding haha!)

So without further ado, here's how it went!

Materials

  • Old, worn solid wood coffee table
  • Primer (I used Painter's Touch primer from Home Depot)
  • 2 cans of Creamy White spray paint (I used Painter's Touch Satin Heirloom from Home Depot)
  • 1 can of polyurethane to seal it (I used Minwax polyurethane spray from Home Depot)
  • Sufficient outdoor space (and some accompanying good weather)
  • Plastic drop cloth
  • 180 grit sandpaper (for the initial 'roughening')
  • 220 grit sandpaper (for the 'distressing')
  • *Optional* Foam block sander (these are fantastic for softly sanding edges without the risk of compromising the nice, strong lines of sharp edges)
You'll want a lot of outdoor space for this, between the sanding, paint fumes, and definitely the sealing fumes.  At the generosity of a good friend of mine (who I'll totally plug HERE), I was able to do this outside during a very nice day (albeit very humid).

I started off sanding the entire table so that the primer and paint would stick to all the old surfaces.  I was lucky enough to have some help with the sanding from two little darlings who were anxious to get involved with the project (thanks, ladies!)


Once that was finished I moved on to priming the entire table.  As you can see below, there were a lot of ridges and little nooks and crannies where I had to be sure to get the primer without over-spraying and causing unwanted buildup or dripping.


Getting all the edges ended up being easier just leaning the table over on its side as opposed to putting it upside down (which would have hindered the ability to do the top of the table while the legs were being done)


Once the primer was completely dry (which didn't take long since I got the quick-drying spray) I started on the first of two coats of my creamy white paint.  Because it was humid the drying time was a little longer than expected (and because I got the 2x coverage paint it went on quite heavy).  Total drying time for 2 coats was approximately 3 hours (that does not count curing which can take several days)


I didn't actually document the process of distressing since it was very labor intensive in the heat and with all the bending over and kneeling (on my bad knee this is a pretty big task - and also explains why my hamstrings are killing me today... where did I put that chardonnay...).  Essentially what I did to distress this piece was I mostly used a foam block sander at a very soft grit and I went along all the sharp edges of wood anywhere I could see.  I took off only a little bit of the paint in these areas, and on all the corners, and did a little distressing on the curved portions of exposed wood on the legs and the cross-beam.  After I was satisfied with the distressing, I thoroughly dusted the entire piece and wiped it down with a damp rag to remove any missed paint/wood dust.

Once the distressing process was finished, I had to get to work sealing it.  I used a spray polyurethane fast-drying sealer for my table.  I have intentions for the top of this table at a later date, so I wasn't too generous on the top with the sealer as it will be re-sealed later anyway.  I did do two full coats of the sealer on all sides of the legs to prevent staining or unwanted 'distressing' from wear and tear.

After all was said and done, the edges on the legs look exactly how I was envisioning they would.


I was very pleased with the finish of the polyurethane and how it made the whole piece shine too.


I think the new table fits very nicely in my living room!


If you have any questions or would just like to pass on your own fun DIY tips, I'd love to hear from you!


Sunday, April 24, 2011

My first quilt!

So today I finished my first quilt for some friends of mine who are having a baby soon.  It is a rag quilt, because I figured it'd be a nice intro to quilting where I didn't have to attempt hand-stitching, haha.  It's my first attempt ever - so be kind!

ruler, self-healing mat, rotary cutter, and some spring-scissors

polyester quilt batting


Here are the squares I cut of the fabrics I chose.  I picked a nice, soft flannelette in 5 different patterns.

I sewed the squares, with squares of batting sandwiched in between.  Then I sewed the squares together into strips.

strips of the squares

strips sewn together

back of the rag quilt


Here's the quilt all sewn together, from the back!  If you look closely you can see that I snipped the edges of the seams about every inch or so.  All of the seams you saw sewn 'upward' were similarly snipped.  You'll see why in the next picture!


And the finished product!  As you can see, once the quilt is then washed and dried (cleaning the lint trap a LOT), the seams curl around and get all soft and cute and stuff (everybody awwww!)

Can't wait for the baby shower next weekend to present it to the parents-to-be!